

Automotive engines are complex machines, and understanding their fundamental repair principles can empower vehicle owners. This article provides an overview of essential automotive engine repair concepts, aiming to demystify common issues and outline the steps involved in addressing them.
Engine Fundamentals: The Heart of Your Vehicle
The internal combustion engine is the powerhouse of most automobiles. It functions by converting chemical energy stored in fuel into mechanical energy that drives the vehicle’s wheels. This process involves a series of controlled explosions within cylinders.
The Four-Stroke Cycle: A Rhythmic Dance of Power
Most gasoline engines operate on a four-stroke cycle, a precise sequence of events that repeats continuously. Understanding this cycle is crucial for diagnosing many engine problems.
Intake Stroke: Breathing In
The engine’s intake stroke begins with the piston moving downwards within the cylinder. The intake valve opens, allowing a mixture of fuel and air to enter the combustion chamber. Think of this as the engine taking a deep breath. The precise ratio of fuel to air is critical for efficient combustion and optimized performance. Too much or too little of either can lead to a variety of issues.
Compression Stroke: Building Pressure
As the piston moves upwards, both the intake and exhaust valves close, trapping the fuel-air mixture. This upward motion compresses the mixture into a smaller volume, significantly increasing its pressure and temperature. This preparatory stage is like squeezing a spring, storing potential energy for the next event. The efficiency of this compression directly impacts the subsequent power output.
Power Stroke: The Explosion of Energy
At the peak of the compression stroke, the spark plug ignites the compressed fuel-air mixture. The resulting explosion creates a rapid expansion of gases, forcing the piston downwards with considerable force. This is the stroke that generates the power to move the vehicle. It’s the main event, the release of the stored energy. This generated force is transferred through the crankshaft, the engine’s main rotating shaft.
Exhaust Stroke: Exhaling Waste
Following the power stroke, the piston moves upwards again, and the exhaust valve opens. This action expels the burnt gases from the cylinder, clearing it for the next intake stroke. This is akin to the engine exhaling, releasing the byproducts of combustion. Effective scavenging of exhaust gases is vital for maintaining engine efficiency.
Key Engine Components: The Building Blocks
Several core components work in concert to execute the four-stroke cycle. Familiarity with these parts is the first step in diagnosing and repairing engine issues.
Cylinders and Pistons: The Core Chambers
Cylinders are the hollow tubes within the engine block where combustion takes place. Pistons are the cylindrical components that move up and down within these cylinders. They are driven by the expanding gases and, in turn, drive the crankshaft. The tight fit between the piston and cylinder wall is essential to maintain compression.
Valves: The Gates of Air and Exhaust
Intake and exhaust valves control the flow of the fuel-air mixture into and burnt gases out of the cylinders, respectively. They are operated by the camshaft, synchronized with the crankshaft. Their precise timing is critical for engine operation.
Crankshaft and Connecting Rods: Translating Motion
The crankshaft converts the linear (up and down) motion of the pistons into rotational motion, which ultimately powers the vehicle’s transmission. Connecting rods link the pistons to the crankshaft.
Spark Plugs: The Igniters
Spark plugs deliver the electrical spark that ignites the fuel-air mixture in gasoline engines. Their condition and proper gap are vital for consistent combustion.
Fuel Injectors: Delivering the Fuel
In modern engines, fuel injectors precisely meter and spray fuel into the intake manifold or directly into the combustion chamber. Their proper functioning ensures the correct fuel-air ratio.
Common Engine Problems and Diagnoses: Unraveling the Mysteries
Engine issues can manifest in various ways, from subtle performance degradations to dramatic failures. Understanding these common problems and their diagnostic approaches is essential for efficient repair.
Overheating: The Engine’s Fever

Engine overheating is a serious condition that can lead to significant damage. It occurs when the cooling system is unable to dissipate heat effectively.
Causes of Overheating: A Breakdown
- Low Coolant Level: Leaks in the cooling system, such as a faulty radiator, hoses, or water pump, can lead to a loss of coolant.
- Faulty Thermostat: The thermostat regulates coolant flow. If it gets stuck closed, it prevents coolant from circulating to the radiator.
- Clogged Radiator: Debris or internal corrosion can block the radiator’s passages, impeding heat transfer.
- Malfunctioning Water Pump: The water pump circulates coolant. If it fails, coolant stops flowing.
- Leaking Head Gasket: A blown head gasket can allow exhaust gases to enter the cooling system, increasing pressure and temperature.
Diagnosing Overheating: Tracing the Hot Spots
- Visual Inspection: Check for coolant leaks under and around the vehicle. Inspect hoses for cracks or swelling.
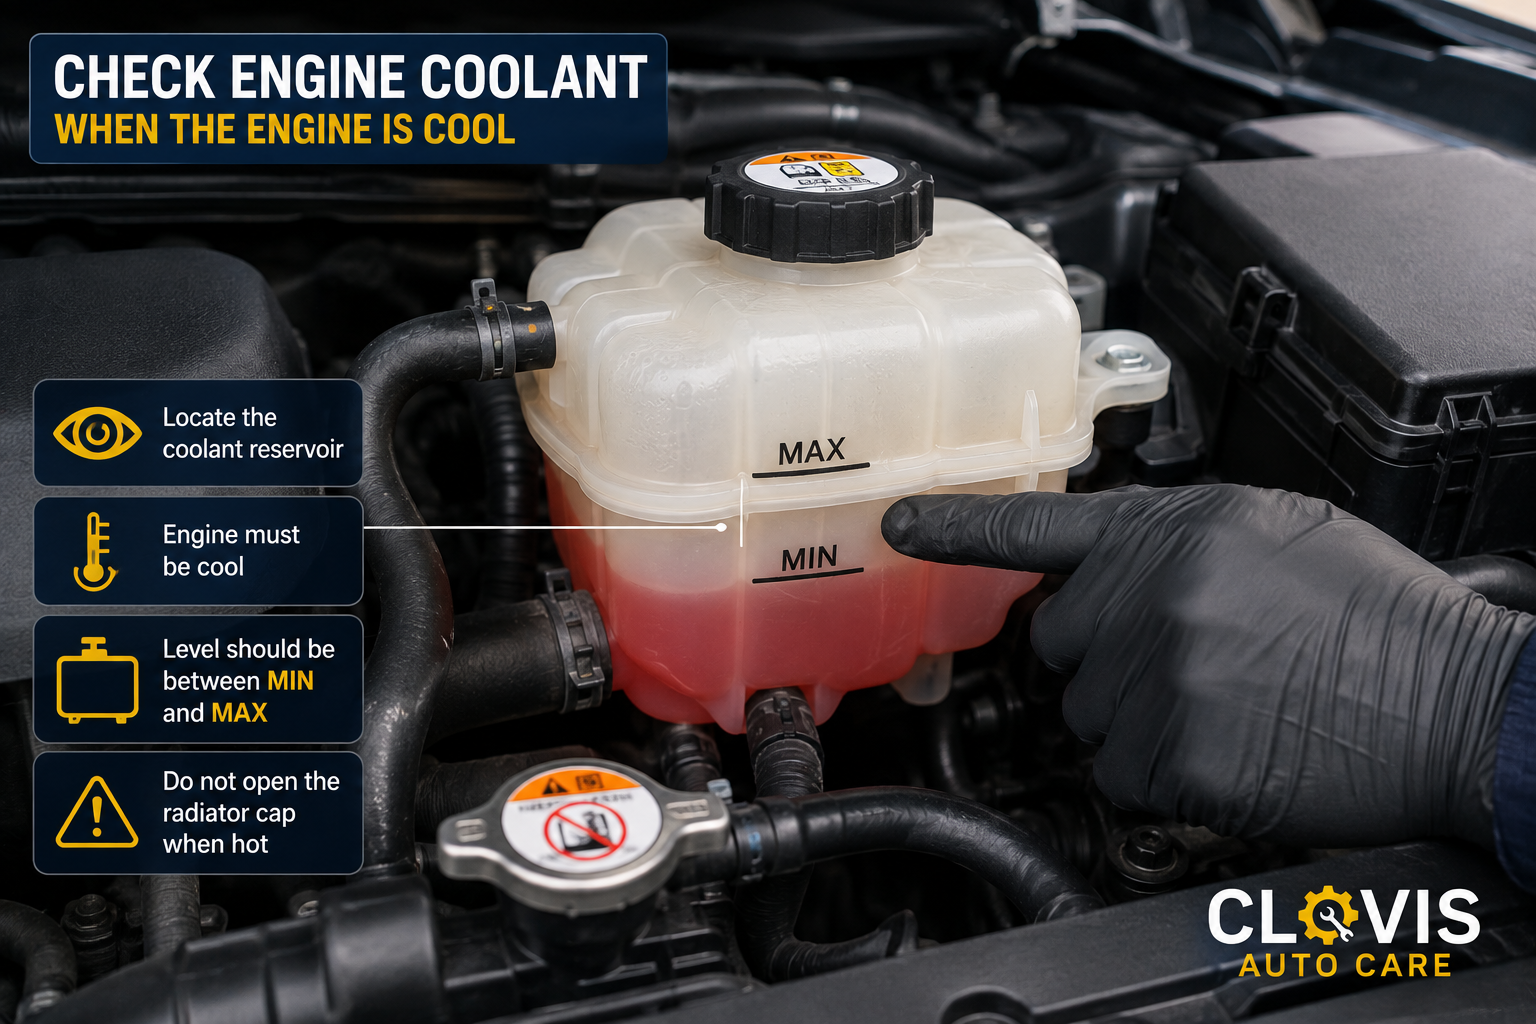
- Coolant Level Check: Ensure the coolant reservoir is filled to the appropriate level.
- Temperature Gauge Observation: Monitor the vehicle’s temperature gauge; a consistent rise above normal indicates a problem.
- Radiator and Fan Operation: With the engine running and at operating temperature (carefully), check if the radiator is hot and if the cooling fan activates.
Misfires: The Engine’s Coughs and Stutters
An engine misfire occurs when one or more cylinders fail to combust properly, leading to rough idling, loss of power, and increased emissions.
Common Causes of Misfires: The Disruptors
- Faulty Spark Plugs or Wires: Worn, fouled, or damaged spark plugs, or cracked spark plug wires, can prevent a strong spark.
- Bad Ignition Coils: In modern vehicles, ignition coils supply voltage to spark plugs. A failing coil will prevent ignition.
- Clogged Fuel Injectors: If a fuel injector is partially or completely blocked, it cannot deliver the necessary fuel to the cylinder.
- Vacuum Leaks: Unmetered air entering the intake manifold disrupts the fuel-air ratio, leading to poor combustion.
- Compression Issues: A worn piston ring, damaged valve, or blown head gasket can result in low compression in a cylinder.
Diagnosing Misfires: Pinpointing the Stumbling Cylinder
- Check Engine Light: A flashing or solid Check Engine Light is often an indicator of misfires. Diagnostic trouble codes (DTCs) can pinpoint the affected cylinder(s).
- Listen to the Engine: A misfiring engine may produce an uneven or sputtering sound during operation.
- Spark Plug Inspection: Removing and examining spark plugs can reveal fouling, damage, or improper gap.
- Fuel Injector Testing: Specialized tools can be used to test the spray pattern and flow rate of fuel injectors.
Oil Leaks: The Engine’s Oozing Wounds
Oil leaks are common and, if left unattended, can lead to serious engine damage due to low oil levels.
Sources of Oil Leaks: Where the Oil Escapes
- Valve Cover Gasket: This gasket seals the valve cover to the cylinder head. Over time, it can harden and crack.
- Oil Pan Gasket: Located at the bottom of the engine, this gasket seals the oil pan to the engine block.
- Oil Filter Seal: A loose or damaged oil filter can cause leaks.
- Crankshaft Seals: Seals at the front and rear of the crankshaft can degrade and leak.
- Oil Pressure Sending Unit: This sensor can develop a leak.
Diagnosing Oil Leaks: Following the Oily Trail
- Visual Inspection: Look for oil residue on the exterior of the engine. Tracing the leak upwards from the pooling oil can help identify the source.
- Check Oil Level Regularly: Consistently low oil levels are a strong indicator of a leak.
- Use Dye (if necessary): In some cases, a fluorescent dye can be added to the engine oil and then viewed with a UV light to pinpoint small leaks.
Basic Maintenance: The Preventative Medicine
Regular maintenance is the cornerstone of engine longevity. Addressing minor issues before they escalate can save significant time and money.
Oil Changes: The Lifeblood of the Engine
Engine oil lubricates moving parts, dissipates heat, and cleanses the engine. Regular oil changes are paramount.
Frequency and Type of Oil: The Right Prescription
- Consult Your Owner’s Manual: The manufacturer specifies the recommended interval for oil changes based on mileage and time.
- Oil Viscosity and Type: Use the correct viscosity (e.g., 5W-30) and type (conventional, synthetic blend, or full synthetic) of oil as recommended by the manufacturer. Synthetic oils generally offer superior lubrication and protection.
The Oil Change Process: A Step-by-Step Guide
- Warm Up the Engine: Slightly warmed oil flows more easily.
- Locate and Remove Oil Drain Plug: Place an oil drain pan beneath the plug and carefully remove it.
- Drain Old Oil: Allow the oil to drain completely.
- Replace Oil Drain Plug: Reinstall the drain plug with a new crush washer if recommended.
- Remove and Replace Oil Filter: Unscrew the old oil filter and screw on a new one, pre-lubricating the rubber gasket with a thin film of new oil.
- Add New Oil: Pour in the specified amount and type of new oil.
- Check Oil Level: Start the engine briefly, then turn it off and check the oil level on the dipstick. Top up as needed.
Air Filter Replacement: Allowing the Engine to Breathe Freely
The air filter prevents contaminants from entering the engine. A clogged filter restricts airflow, reducing performance and fuel efficiency.
Signs of a Clogged Air Filter: The Choked Breath
- Reduced Engine Power: The engine struggles to accelerate.
- Decreased Fuel Economy: You notice more frequent trips to the gas station.
- Black Smoke from Exhaust: In extreme cases, a severely clogged filter can lead to incomplete combustion.
Air Filter Replacement: A Simple Procedure
- Locate the Air Filter Housing: Typically a black plastic box under the hood.
- Open the Housing: Usually secured by clips or screws.
- Remove Old Filter: Note its orientation.
- Install New Filter: Ensure it sits flush and correctly.
- Close Housing: Securely reattach the cover.
Understanding Diagnostic Tools: The Mechanic’s Toolkit
Modern engine diagnostics rely heavily on specialized tools that allow for precise identification of problems.
OBD-II Scanners: The Engine’s Communication System
On-Board Diagnostics (OBD-II) systems are mandated in most vehicles and provide a standardized interface for accessing engine performance data and diagnostic trouble codes (DTCs).
Reading Diagnostic Trouble Codes (DTCs): Unlocking the Engine’s Secrets
- OBD-II Scanner: Connect the scanner to the OBD-II port, usually located under the dashboard.
- Retrieve Codes: The scanner will display a list of DTCs stored by the vehicle’s computer.
- Interpreting Codes: Each code (e.g., P0300 for a random multiple cylinder misfire) corresponds to a specific issue that can be researched using diagnostic manuals or online resources.
Live Data Stream: Real-Time Engine Insights
OBD-II scanners can also display live data from various engine sensors, providing real-time information on
- Engine Speed (RPM)
- Coolant Temperature
- Throttle Position
- Oxygen Sensor Readings
- Fuel Trim (adjustments the engine computer makes to the fuel mixture)
Analyzing this data can help identify intermittent problems or confirm the symptoms of a known issue.
Multimeters: Measuring the Electrical Flow
A multimeter is an essential tool for diagnosing electrical issues within the engine’s systems.
Key Functions of a Multimeter:
- Voltage Measurement: Testing battery voltage and the output of the alternator.
- Resistance Measurement: Checking the continuity and resistance of sensors, wires, and ignition components (e.g., spark plug wires, ignition coils).
- Amperage Measurement: Measuring electrical current flow in circuits.
Understanding how to use a multimeter allows for the systematic testing of individual electrical components that may be contributing to engine problems.
Essential Repair Procedures: Getting Your Hands Dirty
When basic maintenance isn’t enough, and a problem is identified, some repair procedures are within the reach of a determined DIY mechanic.
Replacing Spark Plugs and Wires/Coils: Rejuvenating the Ignition
Addressing ignition system issues is often a straightforward repair.
Step-by-Step Spark Plug Replacement:
- Identify Spark Plug Locations: They are typically found on the cylinder heads.
- Remove Spark Plug Wire/Coil: Disconnect the wire or unbolt the ignition coil from the spark plug.
- Use a Spark Plug Socket: Employ a dedicated spark plug socket wrench to unscrew the old spark plug.
- Inspect Old Spark Plug: Examine for signs of fouling, wear, or damage.
- Gap New Spark Plug: Ensure the new spark plug is gapped to the manufacturer’s specifications using a gap tool.
- Install New Spark Plug: Thread it in by hand initially to avoid cross-threading, then tighten with the socket wrench.
- Reconnect Wire/Coil: Reattach the spark plug wire or ignition coil.
Replacing Spark Plug Wires or Ignition Coils:
This process is similar to spark plug replacement, with emphasis on carefully disconnecting and reconnecting the specific ignition components being replaced.
Replacing Belts: Maintaining Power Transfer
Serpentine belts and timing belts play critical roles in driving various engine accessories and maintaining valve timing, respectively.
Serpentine Belt Replacement:
This belt drives accessories like the alternator, power steering pump, and air conditioning compressor.
- Locate the Serpentine Belt Tensioner: This mechanism applies tension to the belt.
- Release Tension: Use a wrench or specialized tool to pivot the tensioner and relieve pressure on the belt.
- Remove Old Belt: Slip the old belt off the pulleys.
- Route New Belt: Follow the belt routing diagram (often found under the hood) and place the new belt onto the pulleys.
- Release Tensioner: Slowly allow the tensioner to reapply pressure to the new belt.
- Check Belt Alignment: Ensure the belt is running true on all pulleys.
Timing Belt Replacement (Advanced):
Timing belt replacement is a more complex procedure and is often best left to experienced mechanics due to the critical nature of valve timing. Incorrect installation can lead to severe engine damage. It involves carefully aligning camshaft and crankshaft timing marks.
By understanding these fundamental principles and common issues, vehicle owners can approach automotive engine repair with greater confidence. Regular maintenance and a methodical approach to diagnosis are key to keeping your engine running smoothly.






Leave a Reply